February 26, 2013

Kameez - Taking Measurements

Take the following measurements.I am inspired by Amina Creations.Click Here to view the blog.I have made some changes.Take the measurement as how tight(or how loose) you want your dress to be.Dont consider seam allowance here.


Neck width is not a round measurement.It just means the width of your dress' neck hole.
Measure how deep you want your back neck and front neck to be.
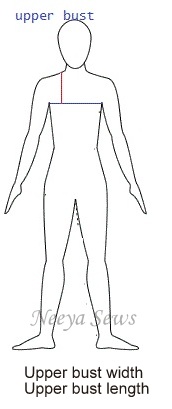
The upper bust width is a round measurement and is taken through the armpits, keeping your hands relaxed.
Bust Length
Bust Width
Bust width is a round measurement and is to be taken around the fullest part of your bust.

Waist length
Waist width

Waist widht is a round measurement and is taken around the slimmest part of your body.
Hip Length
Hip Width
Hip width, a round measurement is taken around the fullest part of your hips.

Length determines the length of your kameez or kurti.For Salwar Kameez, its usually 3-5" above knees and for churidaar, I take it 1-2 inches longer than knees.
By flare I meant kurti's width(left to right)at its bottom edge.The red line joining the green lines in diagram depicts the flare.

Sleeve Length(either short sleeve or long sleeve)
Sleeve width.
Sleeve width is a round measurement.


Get someone's help to take the measurements.
Always take measurements in a relaxed position.
Take care to wear good UGs to get exact measurements.

If you are lazy to take so much of measurements, you may do away with upper bust length, bust length and hip length.Because all these 3 measurements can be calculated approx. from waist length as shown below.

Bust length             = 4" to 5" above waist length.
Upper bust length  = 2" above bust length.
Hip length              = 7" to 8" below waist length.

February 23, 2013

Blog Design

WORKING WITH THE DESIGN OF YOUR BLOG

Now that you have a basic blog, with your favicon and header in place, its time to work deeper with the design of your blog.

1.Go to Dashboard.Click Template.
     or you can go directly from your blog, by clicking Design at the top right hand corner of your blog.

2.Takes you to the template window

3.Before doing anything you may save your template by clicking the Backup/Restore button on the top right hand corner of the page.If anything goes wrong you can always restore your previous template.(Since we have done nothing here on the blog, I didnt backup)Now click Customize.It takes you to the following window.


4.You can change the template here.You can also view the effect of this change on your blog right beneath.
5.You can also work with the background colour theme.

6.You can also adjust the width of your side bars and the blog

7.Next, you can choose a suitable layout.
8.Under the Advanced link, you can choose the font style ,font size and colour for Blog title,page text, tab texts, links and many other things.Here you can work around with many things.Once done, you can apply the canges to your blog.

February 22, 2013

Jaipur

A Weekend in the Pink City,Jaipur

Photo Gallery

GulmargGulmargGulmargGulmarg


We went to Jaipur early in the morning by the ajmer shatabdi express.By aftternoon we reached Jaipur and lodged ourselves in a hotel.Soon we set off for site seeing.

JAIPUR ZOO
Though not much interesting for adults, it was huge fun for my son.Getting to see animals that he gets to see only in National Geographic Channels,was an amazing thing for him.

ALBERT HALL MUSEUM
Its a very old building situated at the centre of the road.Though old its architecture is spendour.This was the first shot of Jaipur that my camera got to click.Inside, the gallery boasts of rare and beautiful artefacts, all that that comes to our mind, when we think of Jaipur.


AMBER(AMER) FORT
Next day early in the morning we were taken to the major attraction of Jaipur, the Amer Fort.Spread over acres,itz a magnificient feast to the eyes.You may take an elepphant ride up and down the fort if you wish.This fort houses Jai Mandir and Sheesh Mahal, a beautiful room filled with mirrors.

CITY PALACE
It is a complex of palaces.Many of the palaces are now museums.But Chandra Palace is still a royal residence.Maharaja of Jaipur stays here.City palace has beautiful courtyards, gardens and museums.

VRIDAVAN GARDEN
Tired of seeing forts and palace?.Then this is the best place for you.With beautiful flowers and fountains, your mind surely gets refreshed here.

JAL MAHAL
Being converted to a star hotel, entry to this palace is prohibitted.But Of course you can stop and behold this beuatiful palace on water.Forget not to click a foto of this amazing palace.

HAWA MAHAL
It is the image of Jaipur.Its a part of the City palace.Called the Palace of Winds/breeze, its an important landmark of the city.Its design resembles that of a crown of Lord Krishna.Its five storey exterior also looks like a honeycomb of beehive with its 953 small windows.You can view the street life through these jharokhas or windows.

JANTAR MANTAR
Its a collection of enormous atstronomical instruments.Nowadays though it is confined to a tourist attraction.

BIRLA MANDIR
The birla mandir or the Laxmi Narayan Mandir is on our way to the railway station.And we did stop by to offer our prayers.

GulmargGulmargGulmargGulmarg

February 20, 2013

Blog Header

Creating a blog header

By default your blog doesnt have an image header.All that the header shows is your Blog title and the Blog Description.If you want to add style to your blog you can add image headers.There are two things you could do
 1.Upload an already existing image in your system.
 2. Create a Header Image of your own using any photo editing software.

Here I used Picasa 3 to create a picture collage.Thanks to the blog Clover Lane.She has given a detailed description of how to make a picture collage.You can find the link to her site here.
Once your picture collage is ready, its time now to upload to your blog.

UPLOADING THE HEADER IMAGE


Go to your dashboard, select Layout.


Click Edit button under the Header area.You will be taken to the Configure Header window.


Before selecting your image from your system, dont forget to ensure that the Shrink to Fit option is left unchecked.Once it is unchecked, you can click the browse button and selct the image to be uploaded.


You can have your image placed behind the blog title and description, or it can be placed instead of blog title and blog description,or you can have your blog description(and blog description alone) placed after the image.


Click Save.


Its Done. Now you can view your blog.It has a much better personalized header now.


February 19, 2013

Blog Layout-Favicon

Blog Layout-Favicon

Favicon is the icon or the small picture that shows to the left of any URL.In blogger it is this.


Instead of this you can use your own customized icon for your blog.
To do this you go to the dashboard, select Layout.
Dashboard is what you see in the following image.


When you click layout, you are taken to the following page.At the top left hand corner ,you can see Favicon.

To change the icon,click edit
.

By clicking the Browse button you can select any square image(size less than 800kb) stored in your system that you would want to make your Favicon.

Click Save.

Since it takes some time for the new icon to show on the blog, I am showing you my Favicon for the old blog of mine.


Here i have used a downloaded image.Instead you can create your own.

How to start blogging


This take you to the following page


Sign in with your account.If you dont have one, sign up.


It takes you to your blog lists.Here I already have two.blogon and WeavingNewPassions.
If you are making a blog for the first time, it wont show any(ofcourse).To make a new blog, click on the
New Blog Button on to the left as shown.


It takes you to this window.


You can give a title and an address(the URL at which readers will find u).In computer language the address becomes your domain.Title and address may be the same.

Sometimes you may not get the domain name/address you really wanted(as it happened in the above picture).Try until you get an available one.


Finally I got my domain name NeeyaBlogs.Blog isn't created yet.For this you have to select a template from the templates given beneath the address.
Now press the Create Blog button.


Now it takes you to the blog lists.Here you will see your new blog that you created just now.(mine is learning blogging)


Now you may view your blog.


You may now start adding posts and pages.You may also work deeper with your blog's looks.

Thats it.