March 28, 2013

Create a Drop Down List of Links

In my blog's sidebar, you can see 4 drop down lists, each corresponding for a page.i.e one each for Sewing ,Blogging,Traveling and Cooking.
After a vigarous search for days I found this site , which gave the simplest of all codes  and a clear tutorial on how to create a drop down link list.

Since I had to create four such drop down link lists, I repeated the code four times under the same gadget.What I mean to say is, I didn't add separate Gadget for separate link lists,instead, I added all four of them under the same gadget.


March 21, 2013

Cutting the Neck for Kurti

Getting the neck design right, is the real challenge while sewing salwars.I use the following method to get my neck perfect.

1.Our Kameez has already been cut using the pattern we created before.What we have now is two pieces,front and the back piece.

2.In my pattern,back neck has been cut not just in the back piece,but also in the front piece.If you wish you may leave the front piece untouched.

3.Now to cut the front neck, we need
            a.The front piece of kameez.
            b.An interface (width=neck width+3" & depth= front neck depth+1")
            c.A piece of the kameez' cloth(width=neck width+4" & depth = front neck depth+2")
            d. A neck design.

       
   Here I used a different cloth piece as there was shortage of kameez' cloth.
 
4.Now fold the Interface and cloth piece in half,width wise as shown in the picture below.The front piece is folded in half lengthwise as shown in the picture above.(I think I am confused with the usage of lengthwise and widthwise!Hope the picture explains it all)


5.Draw the neck design (its half actually) on the interface as shown in figure below.

 
6.Now keep this interface over the cloth piece and the front piece of kameez, all 3 alligned neatly at the fold and cut the neck along the design drawn.
 
I did it in two steps.First kept it over the cloth piece and cut the neck as shown in the picture below.

 
Then I cut the neck on the front piece.


This is how I cut the necks.Sewing them will be depicted soooooon.Do not throw away any of these pieces.


March 20, 2013

Stitching Elastic To Bedsheet Corners

I often struggle while making my bed every morning for my bedsheet always keep coming off from the top edge of the mattress.I sincerely wished I had bedsheets with elastic sewn into the edges.But I never saw such fitting bedsheets in Indian Market.Atlast I thought to alter my bedsheets myself.Herez the tutorial to add elastic to corners of your bedsheet.

Things you need:
A Bedsheet that hangs enough to all the four edges.
Sewing Machine
Scissors
Four 7.5" good quality elastic of 1" width.
and finally will power to cut your bedsheets.


Measurement needed:
X is the extra bedsheet that hangs to a side.
X=Width of Bedsheet - Width of Mattress
                              2
If you wish to add elastic to all four corners then you have to adjust the length of the bedsheet, such that only X" hangs to top and the lower side of the mattress.

In my case
I added elastic only on the two top corners of the bedsheet.
My bed was 70" wide and bedsheet was 84" wide.
X=84"-70" =7"
          2
In other words 7" hangs to left and 7" hangs to right of the bed.

To add elastic to all corners I have to adjust the length of the bedsheet in such a way that the bedsheet is only 14" longer than the length of the mattress.So its only 7" that hangs to all the four sides of the mattress.

Method:
1.Now you have X and you have adjusted the length of the bedsheet as well.
2.Hem all the four sides of the bedsheet.
3.Cut a X" by X" square from all the corners of the bedsheet.

I cut a 7" by 7" square from the corners.
4.Now,at one such corner, keeping right sides together,stitch the 2 L shaped edges together as shown in figure.

5.After stitching I have this on the wrong side.
Stitch rest of the corners as well.
The right side looks like this.

6.Now mark at 10" to left and 10" to right of this new corner.
Do so for all the corners.So now you have 8 marks altogether, 2 each for all the 4 corners.This is where we will sew in our elastics.
7.Insert one end of 7.5" long elastic at the point marked at left side of a corner.To do this you have to rip the seam a bit to get the elastic into it as shown in figure.
 
Stitch the elastic in place firmly.
 Insert the other end of the elastic into the seam at the point marked on the right side of the corner and stitch the elastic in place as shown.

Repeat for the rest of the corners.
Now time to make the bed.
This is how it fits.
Good night.Sleep tight.

Eggless Fruit Cake

It was Monday, and I really wanted to bake.But as I dont eat non veg on Monday I was googling for a recipe of eggless cake.I had some sour grapes lying and I wanted to do away with it too.Hence I ended up with a recipe of eggless fruit cake which I got from here.Ofcourse I had my own twist to it.

Ingredients:
Flour-11/2 cup
Baking Soda-1/4 tsp
Baking Powder-11/4tsp
Salt-1/2tsp
Butter-5tbsp(Iused  butter + veg.Oil)
Sugar-1 cup measured and powdered.
Fruit Cream-1/4 cup.May use any fruit juice.
3/4 cup milk
One orange's pulp mashed
Orange zest-1tbsp
Grapes cut into small chunks-1 cup
Nuts any-1/2 cup

Method
In a bowl sieve all the dry ingredients(1st four) together and set aside. In another bowl beat sugar, and butter until creamy. Add fruit cream,orange zest and orange pulp.Beat well.Now add flour mixture and milk alternatively in three parts,beating well after every addition.Add nuts and grapes into this.Grease a baking pan and transfer the batter into it.Preheat the oven to 160 degress C and  bake for 60 minutes or until a toothpick inserted into it comes out clean.Switch off and leave the pan in the over for another 10 minutes.Then take it out and let it cool for an hour atleast.Now you take the cake out and serve.

Points to Ponder
I used butter paper while baking so that I could take the cake out easily.
Preferably leave the cake overnight to cool.It was really sticky.
This was one cake that I made without much sticking to the rules but came out fine.
 

Rava Kesari

Whenever I make this evening snack /dessert, my youngest sister comes to my mind for its her favorite dish.

Ingredients:

Rava/Semolina-1 cup
Water-2 cups
Sugar-11/4 cups to 11/2 cups as you need.
Salt -a pinch
Ghee- 4 tbsp(I use very little  ghee)
Cashew and kismis to garnish
Food Colour(optional) or Kesar

Method:
In a pan,Heat ghee.Roast cashew and kismis.Keep it aside.In the same pan roast rava until a nice aroma comes or rava appears more granular.Keep the flame low  so that the rava doesn't get burnt.Add sugar and salt.Stir and then add boiling water.Add the food colour.Keep the flame low.Stir well.When the mixture starts to separate from the sides of the pan, add ghee.Mix weel and transfer the mixture to another flat vessel.Spread neatly and cut into desired shapes.Garnish with cashew and kismis.

Points to Ponder
If using kesar,add them to boiling water.
Some people use milk instead of water, but then shelf life gets shorter.
Can add cardamom powder for a flavor.


March 5, 2013

Aloo Muttor

Usually Aloo Muttor is made with turmeric pwdr,chilliy pwdr,coriander pwdr and jeera pwdr.This time I made it with eastern chicken masala and tasted better.

Ingredients
Aloo-1 medium sized cut into cubes
Fresh Muttor-1/4 cup
Onion-1 small cut into somewhat larger chunks.
Tomato-1 small one, chopped
Ginger-1tbsp(I always add ginger liberally,'cos I love it)
Turmeric pwdr-1/4 tsp
Chilly pwdr-1/4 tsp
Chicken masala-11/2 tsp
Salt
water-1/4 cup or less.
Oil-1tbsp
jeera-1/2 tsp
(This serves only one )

Method
Since I was in a hurry I cooked it in pressure cooker.
Heat the oil,add jeera.Saute onion till it becomes soft.Add ginger and fry for half a minute.Add all the masalas,keeping the flame low.As the raw smell of masala goes, add tomato and stir fry.As tomato becomes soft ,add aloo,muttor and salt.Stir for a minute.Add water and pressure cook.Turn the flame off as the first whistle is about to come.May raise the pressure cooker whistle to release some pressure.I do this so that the vegetables doesnt get over cooked.Its a thick curry.So take care when you add water.


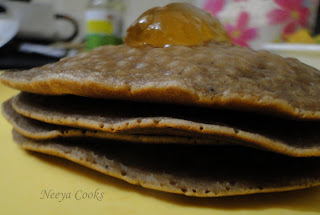
Chocolate Pan Cakes

Ingredients:
Maida -11/2 cups
Egg 1
Salt-1/2 tsp
Sugar-1/4 cup
Oil-1-2tsp
Vanilla Essence-1/2 tsp
Coco Powder-1-2 tbsp
Baking Soda-1/2 tsp
Milk to make batter (approx 11/4 cup)

Method:
Make a batter with all the ingredients except baking soda and 1/4 cup milk.Beat it to a thick batter.
Keep aside for 15 minutes.Now boil/heat the 1/4 cup milk kept aside.Add this and baking soda to the batter and mix well.Now using a ladle pour a spoonful of batter on to a pan.Spread it a little to get a circular shape.Cover and cook over medium flame.Need not flip over.Serve hot with sugar,jam or fruit syrups.

You may add kismis,cashew, badam,dates, orange zest or anything that comes to your mind into the batter to give it a twist.I added orange zest.